How To Use VirtualBox as a GitLab CI Test Runner
Continuous Integration is one of the most beneficial things to add to any serious project. However, setting it up can be costly in terms of time, or money, or both.
Wouldn't it be great if you could get your GitLab CI builds to run against the exact same Virtual Machine you use during development?
Whenever you push up some new code:
- GitLab CI could talk back to a machine of your choice
- Clone your VirtualBox / VMWare VM, and then boot it
composer installall your dependencies- Run your test scripts
- Update GitLab CI with the results...
Sounds amazing, right?
Well, repeat after me in your very best Hubert Farnsworth impression:
Good news everyone!
Because that's exactly what we are going to set up in this very video.
The Road Less Traveled
Now, the vast majority of documentation around GitLab CI / the GitLab CI Multi-Runner talks about Docker.
Don't get me wrong - I think Docker is an incredible tool. But I also think it has a steep learning curve, and in my personal circumstances, I have not yet had the spare time to invest in migrating my working Ansible with VirtualBox setup over to a Dockerised equivalent. There are many reasons for this, but the end result has been that testing via GitLab CI hit a roadblock when it came to acceptance testing.
Most of the .gitlab-ci.yml file examples I have been able to find and examine had me convinced that without fully investing in Docker, I would not be able to achieve what I dearly wanted to achieve - running my browser-based (selenium or phantomjs) acceptance tests during a GitLab CI build.
Thankfully - I have found a solution:
VirtualBox Executor
Honestly, GitLab and the community surrounding it - heck, Open Source in general - never ceases to amaze me.
I want to take this opportunity to say a HUGE thank you to everyone involved in getting the VirtualBox executor into GitLab.
The VirtualBox runner is based on the Parallels runner. Both of them offer only a limited set of features when compared to Docker. Check the Compatibility Chart for reference as to what functionality is / is not available.
This limited set of functionality is more than enough to achieve the goal of unit and acceptance testing however.
I also want to state that I am not advocating the VirtualBox runner as the perfect solution. It is a working solution, but there are quirks that you will need to workaround. I will cover all of the quirks that I have encountered along the way, and my suggested workarounds / fixes where possible.
My Setup
Since recording the earlier videos in this series, my GitLab setup has changed slightly:
GitLab 8.8.3
GitLab Shell 2.7.2
GitLab API v3
Git 2.7.4
Ruby 2.1.8p440
Rails 4.2.6
PostgreSQL 9.2.16
And the GitLab CI Multi-Runner version info:
Version: 1.2.0
Git revision: 3a4fcd4
Git branch: HEAD
GO version: go1.6.2
Built: Sun, 22 May 2016 20:05:30 +0000
OS/Arch: darwin/amd64
To make things easy to record (in other words, for the purposes of this video only) I have installed the GitLab CI Multi Runner directly onto my laptop.
I wouldn't advise this for a real-world setup. In my real-world setup I have a dedicated PC that I use as my development 'server'. It's nothing particularly fancy - it's my old gaming PC actually. On this PC I run Ubuntu 14.04 desktop, VirtualBox, a VNC client, and not a lot else. The Virtual Machines sit on a dedicated SSD, which makes the cloning process faster. I use a desktop variety of Ubuntu so I can easily interact with VirtualBox, rather than rely on the headless version.
What is nice about this setup is that I can leave this PC on 24x7x365 and it will take care of my builds whatever time of day. This probably seems like a "so what?" sort of issue, but what is more interesting is that the machine sits in my office. From my office I don't have any control of the networking equipment (i.e. no login to the router to open ports or whatever) - but this all works without any hassle. The reason for this is that the GitLab CI Multi Runner regular calls back to my GitLab server, rather than the GitLab server needing a direct line of communication to my runner box. Ultimately, this makes it much easier to set this up.
At this point I am going to assume you have some setup you are happy with, and that you have both VirtualBox, and the GitLab CI Multi Runner installed.
Before continuing, if you haven't already done so I would advise you give the VirtualBox executor documentation a once over.
Also, you absolutely must have a .gitlab-ci.yml file in your project. Here is the basic one that I am using:
# /.gitlab-ci.yml

before_script:
  - composer install

stages:
  - test

test:
  script:
  - php vendor/bin/codecept run unit
Configuration - config.toml
The VirtualBox runner goes through a set process whenever a build is triggered.
Firstly, it will clone a base image.
Once the clone is complete, it boots the image, and connects via SSH.
From there, it triggers whatever processes are inside your .gitlab-ci.yml file.
And then whenever the process finishes (on success or failure), it will shutdown and delete the clone.
At least, that's the theory. Things can - and likely will - go wrong along the way.
Getting this to behave is a two step process - sort out your config.toml file, and then make sure your VirtualBox image is in the expected state.
# /Users/codereview/.gitlab-runner/config.toml

concurrent = 1

[[runners]]
  name = "crv-mbp"
  url = "http://gitlab-example.dev/ci"
  token = "21602c7841b54de5bb378526c91446"
  executor = "virtualbox"
  [runners.ssh]
    user = "deploy"
    password = "deploy"
  [runners.docker]
    tls_verify = false
    image = ""
    privileged = false
    disable_cache = false
  [runners.parallels]
    base_name = ""
    disable_snapshots = false
  [runners.virtualbox]
    base_name = "symfony-3-tutorial.dev"
    disable_snapshots = false
  [runners.cache]
    Insecure = false
To make this work you need to have configured both the [runners.ssh] section, and the [runners.virtualbox] section.
I am using the deploy / deploy combination as I am using Ansible to configure my VirtualBox instances, and I know this user / pass combo will be available on the box.
The name, url, and token fields will all be different for you. Ensure you are using HTTPS in production / the real world. I am going with HTTP during this video as it is one less thing to worry about, but don't skip this step in your setup.
The [runners.virtualbox] section is equally important.
I would strongly advocate you use a build tool - such as Ansible - to handle the creation / management of your Virtual Machine infrastructure. If you don't then please (please!) remember to take backups / snapshots before going further. Things can and do go wrong.
Next, here comes the first issue where it makes life easier if you have a GUI.
Firstly, with VirtualBox - to the best of my knowledge - you cannot snapshot a running virtual machine. I will come back to this shortly.
To find the base_name, you should right-click your Virtual Machine and on the 'General > Basic' section, the name field is your base_name:
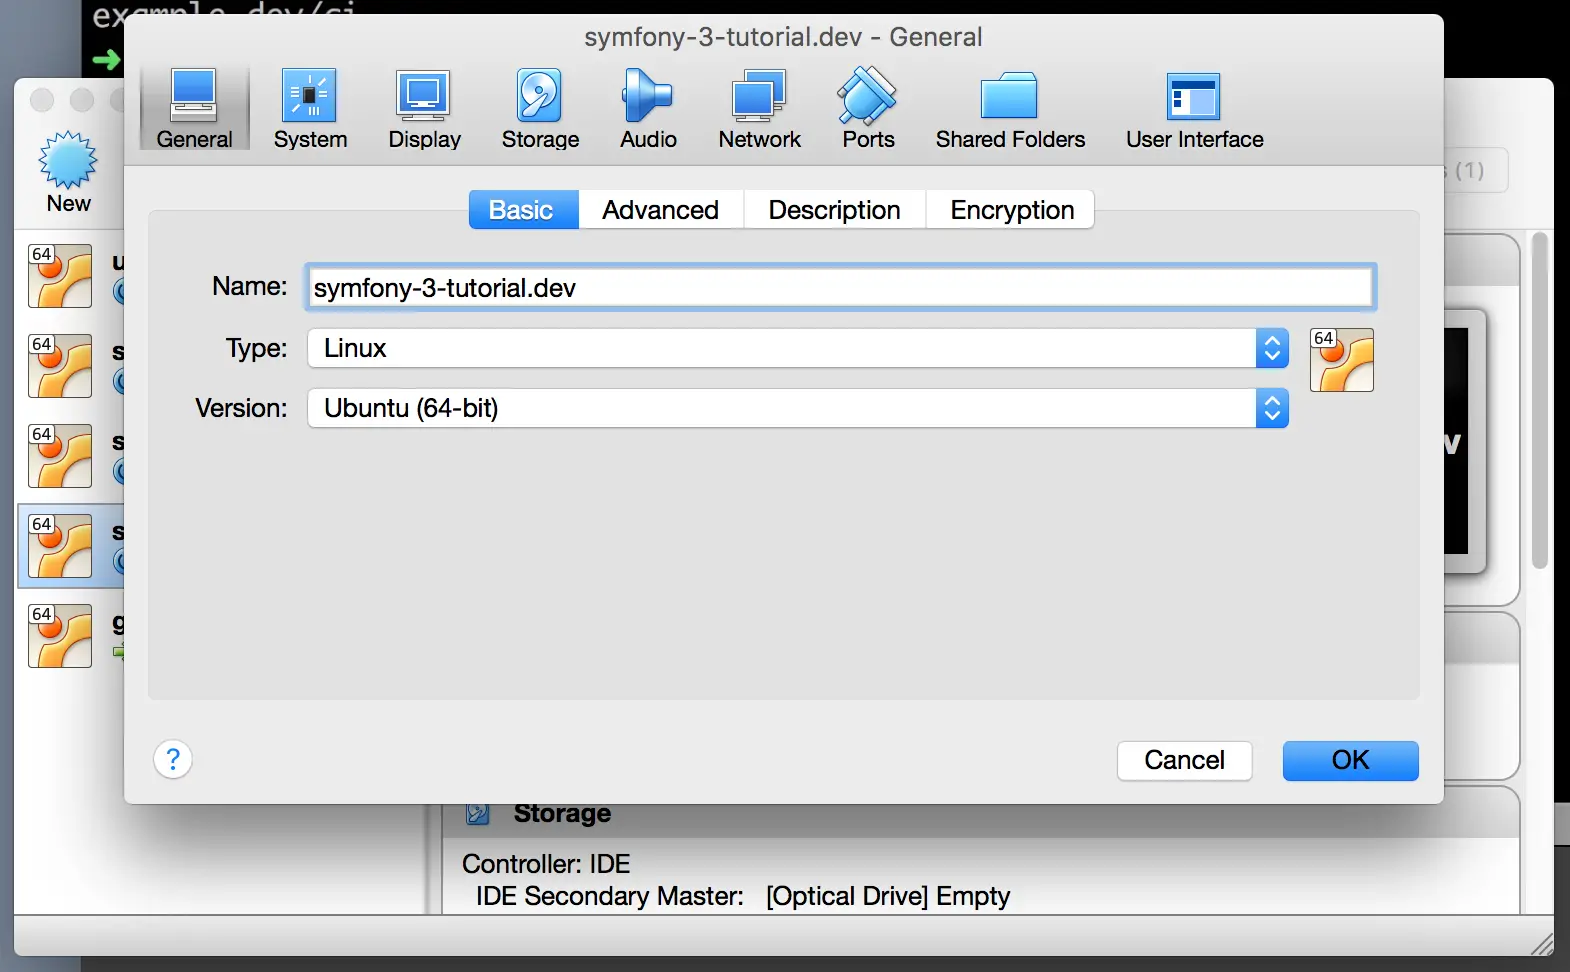
Copy / paste the Virtual Machine name into your config.toml > base_name field.
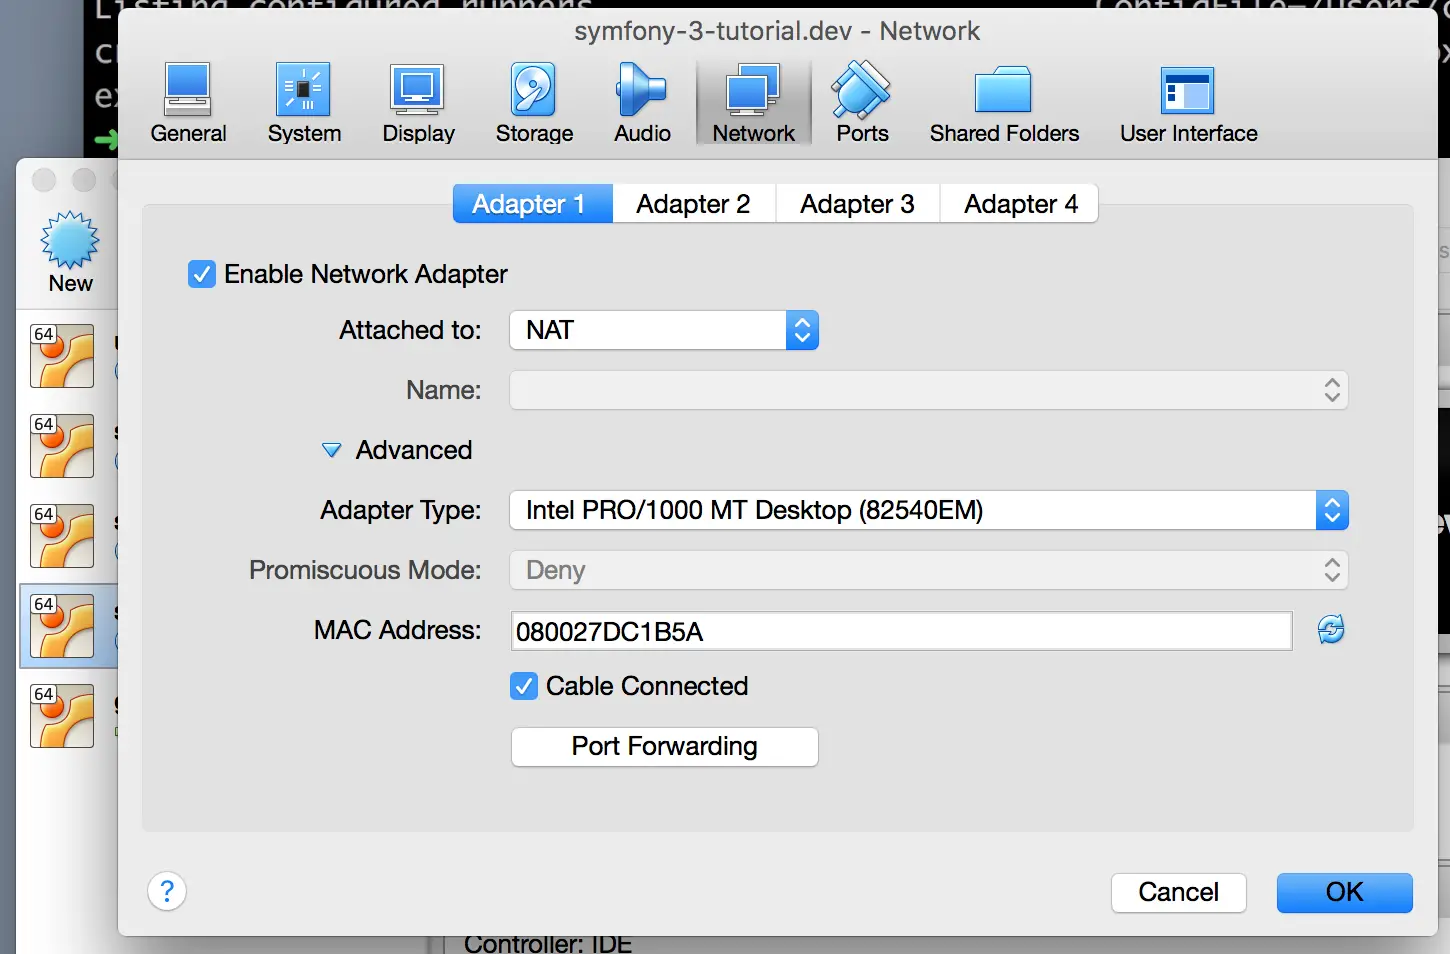
Secondly, you must set the network adapter to NAT - this is critical:
If you don't do this, you will likely see something like the following:
gitlab-ci-multi-runner 1.1.4 (9e2fd1a)
Using VirtualBox version 5.0.18_Ubuntur106667 executor...
Creating new VM...

ERROR: Build failed: dial tcp 127.0.0.1:43342: getsockopt: connection refused
Herein lies a problem, however, in that you either need to shutdown your active development VM during a test phase (not good), or you have to take a clone of your development VM whenever making infrastructure changes, or you provision two VM's using the same build script.
This is because, as mentioned, you cannot snapshot a running VM, and the VirtualBox executor needs to snapshot / clone the VM as part of the GitLab CI build phase.
Also, because the VM is set to use a NAT'ted network adapter, it will no longer be (easily) accessible. Instead you will need to either work directly on the VM Console (again, why I use a Linux desktop / GUI for my VM host), or configure port forwarding in the 'advanced' section as per the screenshot above.
Debugging The GitLab CI Multi Runner
Once you have installed the GitLab CI Multi Runner it will continue running, and calling back to the configured GitLab server in the background. Depending on which OS you are installing the runner on, depends on how the runner will run - I don't have specifics on the this but on OSX I did not get a new user created (that I could see), whereas on Ubuntu I found there is a new user account created.
Ultimately this makes seeing the output of the runner quite tricky. So, whilst getting your setup working, I would recommend using the following command:
gitlab-ci-multi-runner --debug run
This gives a verbose output as to exactly what is happening - and may be causing issues - on your GitLab CI runner machine.
Now, this causes a potential conflict with the other runner you installed - in that you will now have two runners running on the same system, as far as I am aware.
This can lead to sporadic build failures, with errors such as this:
gitlab-ci-multi-runner 1.2.0 (3a4fcd4)
ERROR: Build failed: exec: "vboxmanage": executable file not found in $PATH
If you see this sort of thing, just re-run the build. If all goes well, almost immediately after triggering a build you should see lots of 'stuff' in the console.
If you still don't get much luck, I found ctrl+c to exit the debug runner, then simply restarting the debug runner would usually solve any problems with builds continually struggling.
Running and Clean Up
At this stage, the runner should be behaving.
It should clone your powered down base image, boot it up, login, run the contents of your .gitlab-ci.yml file, and then power down... and delete the image.
Only, on my Macbook this isn't the case. It is potentially a permissions issue, but I found on the Mac / OSX that the cloned images are not being deleted after a run - successful or not.
This is somewhat useful in that you can re-use the machine in the event that something failed. But again, due to NAT and what-not, it's not particularly seamless to do so.
And this is a bit of an issue as per clone, the VM file on disk will be approx 6gb in my case. If left unchecked, this could very quickly fill the disk. Proactive maintainence is therefore advised - but again, I only experienced this on OSX. On Linux, the VM's delete just fine.
Wrapping Up
This is how you can get a basic VirtualBox setup to work.
So far we haven't actually addressed the issue of running Acceptance tests (browser tests that need Selenium / PhantomJS) which was the original requirement that led me down this road to begin with.
This is exactly what we will cover in the very next video, including using a Docker selenium container to remove any external requirements, which is pretty awesome in my opinion.